
If you bought your kit after March 2024, you should use this guide. The difference is that we now use a special card for Mach3 to avoid having a UC100 module in between
| After you install Mach3 (if that is your chosen control software) you can update the appearance of the layout itself. The original version of mach3 looks old but we have created a brand new layout for the program which is easy to install, there is another guide for that on this homepage. |  |
Install Mach3

Install Mach3 by following the manufacturer’s instructions. Mach3 software can be downloaded from their website https://www.machsupport.com/software/mach3/ .
During installation, the software asks if you want to install LTP port support, select “Yes” and then restart the computer when prompted.
Install Creative Mach3 profile for Mach3 in two steps
To get all the settings into Mach3 automatically, you have to paste our files. You can download the creative profile from here.
Step 1
The files come in Zip format so you need to unzip them. In Windows, right-click the file and choose to extract it. If that doesn’t work, you can download Winrar, which is free. Pick the right folder for Rack, Ballscrew or belt.
Close Mach3 if you started it and go to the C: folder in Windows (This PC/Windows (C:)) Go to the Mach3 folder, click on it.

Paste all your files located in your foder Ballscrew, rack or belt version (2 files Creative xxx.xml and 1024 RAW.set) paste them directly among the files (marked as paste your files here) above, if the program asks if you want to replace any file, select ” Yes”
Step 2
You also need the plugin for the Mach3 card, download it from here: RnRMotion The file is zipped so you need to unzip it and then paste the file RnRMotion.dll in to the Plugins folder as seen above
Start Mach3
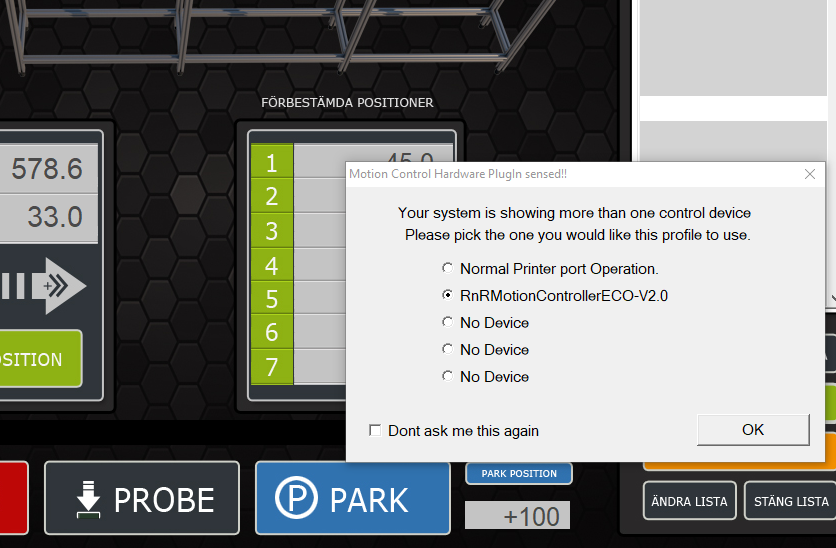
When you have installed Mach3 you will get several icons on the desktop, Open “Mach3 loader” and select profile “Creative Mach3” The program starts and will ask you how you want to control the machine, then select RnRMotionControllerECO-V2.0
When mach3 starts go to View/Load Screens/ and select 1024 RAW.se

Now mach3 starts and you can test the machine.
After installation…
Now that the machine is set up, you can start building your files for cutting. If you are completely new to the field, you can watch the video below.
You can set up your files with an alternative CAM software called Estlcam. With Estlcam you can also cut in 3D and the price is only about 50Eur for the entire software. However, you can not draw in Estlcam but you can do it in any other program. We list a few different softwares at the bottom of this page. You can buy Estlcam on our homepage.
Software and plugins used in the video
- Sketchup 2015 (Free): https://forums.sketchup.com/t/link-to…
- The export DXF plugin for SketchUp (Free): https://www.guitar-list.com/download-…
- Vcarve PRO (Expencive): https://www.vectric.com/products/vcar…
- EstlCam (Cheap): https://www.estlcam.de/ or buy it directly from us.
Drawing software
- Inkscape (Free): https://inkscape.org/
- CorelDraw: https://www.coreldraw.com/en/
- Fusion360 (drawing and CAM, Free for students): https://www.autodesk.com/products/fus…
- Adobe illustrator: https://www.adobe.com/se/products/ill…
- LibreCad (Free): https://librecad.org/
- FreeCAD (Free): https://www.freecadweb.org/
- QCAD (Free): https://www.qcad.org/en/


